
Tech
DNS Security Best Practices: Why Your Domain Name System Deserves More Attention

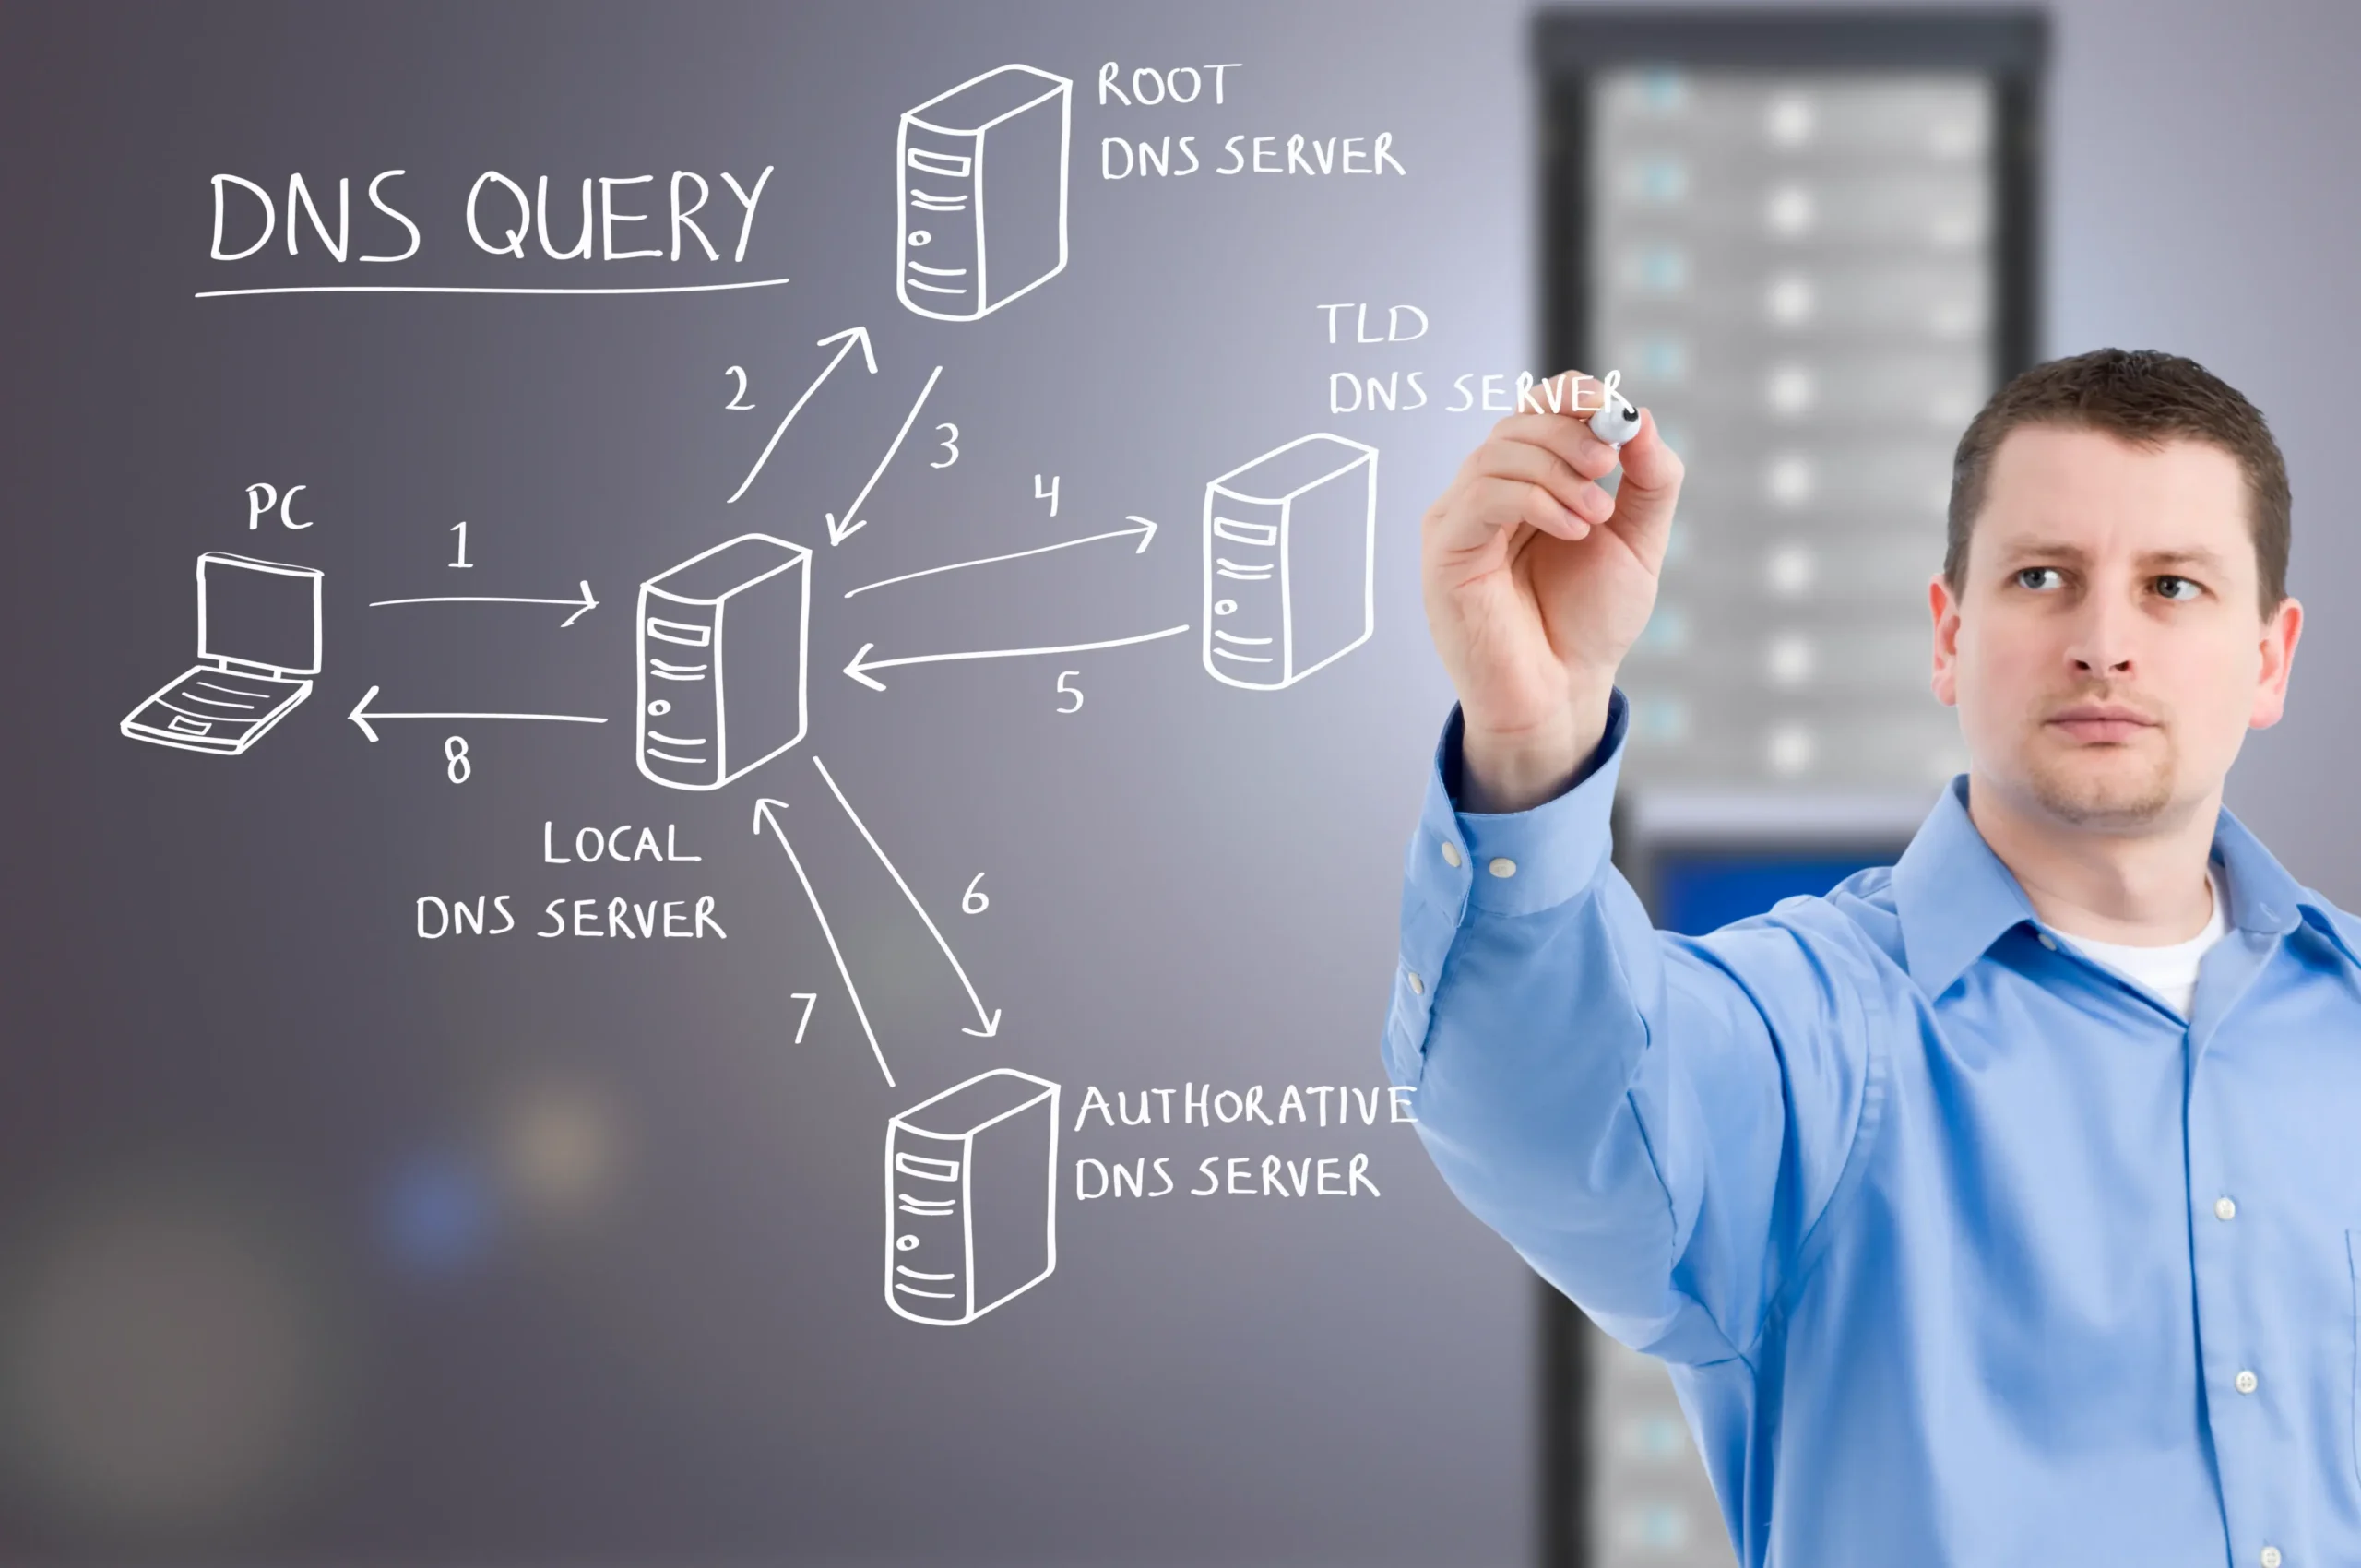
For most organizations, the Domain Name System sits quietly in the background, translating human-readable web addresses into machine-readable IP addresses without anyone giving it a second thought. It works so reliably that it’s easy to forget DNS even exists — until something goes wrong. And when it does go wrong, the consequences can be severe: hijacked traffic, redirected customers, stolen credentials, and reputational damage that takes months to repair.
DNS was never designed with security as a primary concern. It was built in the 1980s to solve a naming problem, not a trust problem. Decades later, that original design still underpins nearly every interaction your business has online — and attackers know it. DNS-based attacks have become one of the most common and most underestimated vectors in the modern threat landscape. This guide walks through why DNS security matters, the most common attack types organizations face, and the practical steps you can take to lock down this often-overlooked layer of your infrastructure.
Why DNS Is a Bigger Risk Than Most Teams Realize
Security teams tend to focus their attention on endpoints, firewalls, and identity systems — and rightly so. But DNS sits at a unique chokepoint: it’s involved in almost every network transaction, from a user loading a website to a server resolving an API call to an email client checking where to deliver a message. If an attacker can manipulate DNS, they can potentially redirect any of that traffic without ever touching your endpoints directly.
A few factors make DNS particularly attractive to attackers:
It’s foundational, not optional. Nearly everything that happens on your network depends on DNS resolving correctly. A single compromised DNS record can silently redirect an entire subdomain’s worth of traffic.
It’s often unmonitored. Many organizations configure DNS once during setup and rarely revisit it. Unlike firewall rules or access policies, DNS records don’t always get regular audits, which means unauthorized changes can go undetected for weeks or months.
It spans multiple stakeholders. DNS records are frequently managed by a mix of IT, marketing (for campaign subdomains), and third-party vendors (for SaaS integrations). This diffusion of ownership creates blind spots — nobody has a complete picture of every record that’s been added over the years.
It’s a stepping stone, not just a target. Attackers rarely compromise DNS purely to cause outages. More often, DNS manipulation is a means to a bigger end: intercepting email, hosting phishing pages on a trusted domain, or quietly exfiltrating data through DNS tunneling.
Common DNS-Based Attacks You Should Know
DNS Spoofing and Cache Poisoning
In a spoofing attack, an adversary injects falsified DNS data into a resolver’s cache, causing it to return an incorrect IP address for a legitimate domain. Users trying to reach your website might unknowingly be redirected to a malicious lookalike site designed to harvest credentials or deliver malware. Because the browser still shows a familiar domain name, most users have no way of knowing anything is wrong.
Subdomain Takeover
When an organization decommissions a service — say, a marketing landing page hosted on a third-party platform — but forgets to remove the corresponding DNS record, that dangling record becomes an opportunity. An attacker can claim the abandoned resource on the third-party platform and effectively take control of a subdomain that still resolves under your organization’s trusted domain name. From there, they can host phishing content, malware, or fraudulent campaigns that appear to come from your brand.
This is one reason many companies commission independent web penetration testing services, which check forgotten subdomains alongside the main website.
DNS Tunneling
DNS tunneling abuses the DNS protocol to smuggle data in and out of a network, bypassing traditional security controls that don’t inspect DNS traffic closely. Because DNS queries are almost always allowed through firewalls by default, this technique has become a favored method for command-and-control communication and slow, low-volume data exfiltration.
DDoS Attacks Against DNS Infrastructure
If your authoritative DNS servers go down, so does everything that depends on them — your website, your email, your customer-facing applications. Attackers understand this leverage, which is why DNS infrastructure is a frequent target for distributed denial-of-service campaigns aimed at causing maximum disruption with a single point of failure.
DNS-Based Email Spoofing
Email is one of the most common places DNS weaknesses get exploited. Without properly configured authentication records, nothing stops an attacker from sending email that appears to originate from your domain. This is the foundation of business email compromise and spear-phishing campaigns that impersonate executives, vendors, or internal departments — often the very campaigns that cause the most financial damage to organizations.
Building a DNS Security Program: Practical Steps
1. Maintain a Complete, Current DNS Inventory
You cannot secure what you don’t know exists. Start by producing a full inventory of every DNS record associated with your domains — A, AAAA, CNAME, MX, TXT, and NS records included. For many organizations, this exercise alone surfaces forgotten subdomains, stale third-party integrations, and records nobody can explain. A routine DNS lookup against your domains is a simple but effective way to see exactly what’s currently published and catch discrepancies before they become incidents. Tools like the dns lookup checker from EasyDMARC make it straightforward to pull a domain’s full record set in seconds, which is useful both for periodic audits and for quickly verifying changes after DNS updates.
2. Remove Dangling Records Immediately
Once you have your inventory, cross-reference every CNAME and subdomain against the services they point to. Any record pointing to a decommissioned or unclaimed third-party resource should be treated as an active risk and removed or reclaimed without delay. Building this check into your offboarding process for any third-party service is far cheaper than cleaning up after a subdomain takeover.
3. Implement Email Authentication End to End
SPF, DKIM, and DMARC work together to prevent domain spoofing in email — but they only provide protection when they’re implemented correctly and kept up to date.
- SPF defines which mail servers are authorized to send email on your domain’s behalf.
- DKIM cryptographically signs outgoing messages so receiving servers can verify they haven’t been tampered with in transit.
- DMARC ties the two together, telling receiving mail servers what to do when a message fails authentication, and gives you visibility into who’s sending email using your domain.
Deploying all three, and monitoring DMARC reports on an ongoing basis, closes off one of the most exploited gaps in DNS-dependent security.
4. Enable DNSSEC Where Possible
DNS Security Extensions add a layer of cryptographic verification to DNS responses, making it significantly harder for attackers to successfully spoof or poison DNS data along the resolution path. DNSSEC adoption has historically lagged due to implementation complexity, but most major registrars and DNS providers now support it with relatively low operational overhead. If your provider offers it, there’s little reason not to enable it.
5. Monitor for Unauthorized Changes
DNS records should not change silently. Set up alerting for any modification to your authoritative DNS zones, and review changes as part of your standard change management process. Unexpected modifications — a new MX record you didn’t request, an altered A record for a critical subdomain — are often the earliest observable sign of a compromise in progress.
6. Restrict Access to Your DNS Management Console
DNS registrar and hosting accounts are high-value targets precisely because compromising them gives an attacker control over your entire domain. Enforce multi-factor authentication on every account with DNS management privileges, limit the number of people who hold that access, and use registry lock features where available to add friction against unauthorized transfers or record changes.
7. Audit Third-Party DNS Dependencies Regularly
Every SaaS tool, marketing platform, or CDN you connect via a CNAME record introduces a dependency outside your direct control. Maintain a living list of these integrations, review it quarterly, and remove entries for services you no longer use. This is one of the simplest habits that meaningfully reduces your subdomain takeover exposure over time.
Making DNS Security a Continuous Practice, Not a One-Time Project
The organizations that handle DNS security well don’t treat it as a project with a defined end date — they treat it as an ongoing discipline woven into their broader security operations. That means regular audits, not annual ones. It means DNS visibility as part of onboarding and offboarding workflows for every third-party service. And it means giving DNS the same level of monitoring and access control rigor already applied to identity systems and endpoints.
DNS may operate quietly in the background, but the attacks that exploit it are anything but minor. A single overlooked record, an unmonitored change, or a missing authentication policy can be all it takes for an attacker to hijack traffic, intercept email, or impersonate your brand at scale. The good news is that most of the fixes are neither expensive nor complex — they simply require consistent attention to a part of the infrastructure that’s too often left on autopilot.
Start with visibility. Know what’s published, know what’s authorized, and know as soon as something changes. From there, the rest of a solid DNS security posture follows naturally.


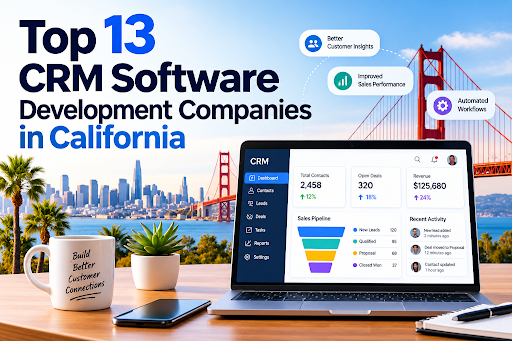
California is home to some of the most influential technology companies in the world, and customer relationship management (CRM) is one of the areas where that expertise shows. Businesses from Silicon Valley startups to Los Angeles real estate firms depend on custom CRM platforms to manage leads, automate sales, and keep customers loyal. Choosing the right CRM software development company can decide whether your CRM becomes a growth engine or an expensive, underused database.
This guide covers 13 companies with a strong California presence, what they are known for, and how to pick the right one.
Why Businesses in California Invest in Custom CRM
Off-the-shelf CRMs work for many teams, but California’s competitive, fast-moving industries often need more. Custom development offers:
- Tailored workflows that match how your team actually sells and supports customers
- Seamless integrations with ERP, marketing, billing, and analytics tools
- Industry compliance, such as HIPAA for healthcare and CCPA for consumer data privacy
- Scalability as your customer base grows
- Full data ownership and control over security
Regulated and relationship-driven sectors benefit most. A specialized healthcare CRM software development solution can manage patient engagement and appointments while protecting sensitive records. Likewise, real estate CRM software development services can organize listings, buyer pipelines, and agent follow-ups in one place.
How We Selected These Companies
We looked at five factors:
- Experience building and customizing CRM platforms
- Industry specialization and domain knowledge
- Technology stack and integration capability
- Security and compliance practices
- Client support, scalability, and delivery track record
The Top 13 CRM Software Development Companies in California
1. Dev Technosys
Dev Technosys leads this list for its end-to-end approach to custom CRM engineering. As an experienced CRM software development company, it designs, builds, integrates, and maintains CRM systems for startups and enterprises. Its teams work across sales automation, customer support, marketing automation, and analytics modules. It is also known for industry-specific builds, including a healthcare CRM software development solution focused on patient management and compliance, and real estate CRM software development services covering lead tracking and property management.
2. Salesforce
Based in San Francisco, Salesforce is the world’s best-known CRM platform vendor. Beyond its products, its ecosystem of consultants and developers supports deep customization through Apex, Lightning, and APIs. It is a strong fit for enterprises that want a mature platform with a huge integration marketplace.
3. Intellectsoft
With a Silicon Valley presence, Intellectsoft focuses on digital transformation and enterprise software. It builds custom CRM solutions for finance, healthcare, and retail clients that need modernization or integration with legacy systems.
4. Grid Dynamics
Headquartered in the Bay Area, Grid Dynamics specializes in large-scale digital engineering. It suits enterprises that need data-rich CRMs with advanced analytics and personalization.
5. Altoros
Altoros, based in Sunnyvale, is known for cloud-native engineering and platform development. Companies seeking a scalable, cloud-based CRM architecture often turn to firms with this profile.
6. Xoriant
Xoriant, with a Sunnyvale base, offers product engineering and digital services. It works with software vendors and enterprises to build and modernize customer-facing platforms, including CRM modules.
7. Persistent Systems
Persistent Systems has a major U.S. presence in Santa Clara. It builds software products and enterprise solutions, including CRM integrations that connect customer data across large organizations.
8. Zoho
Zoho serves customers worldwide with a US presence and a flexible, affordable CRM suite. Its partner network helps small and mid-sized businesses customize workflows without building from scratch.
9. Oracle NetSuite
NetSuite combines CRM, ERP, and e-commerce in one cloud suite. Its implementation partners in California help growing companies unify front-office and back-office data.
10. Apexon
Apexon provides digital engineering and quality assurance services. Its experience in testing and automation helps ensure CRM releases are stable and reliable.
11. Slalom
Slalom has a strong San Francisco and Los Angeles presence and delivers CRM strategy, implementation, and change management, especially on Salesforce and Microsoft platforms.
12. Deloitte Digital
Deloitte Digital combines consulting with technology delivery for large-scale CRM transformation. It is best suited to enterprises with complex, multi-department requirements.
13. Accenture
Accenture offers extensive CRM consulting and implementation across industries. Its scale suits global enterprises that need a long-term transformation partner.
How to Choose the Right CRM Development Partner
Define your goals first. Know whether you need lead management, customer support, marketing automation, or all three.
Look for domain expertise. A generic CRM rarely fits a regulated industry. If you are in healthcare, a provider experienced in a healthcare CRM software development solution will already understand HIPAA, consent management, and patient journeys. If you are in property, a team offering real estate CRM software development services will know listing syndication and agent workflows.
Check integration skills. Your CRM must connect with email, telephony, accounting, and marketing tools.
Ask about security and compliance. Request details on encryption, access controls, and audit trails.
Evaluate support and scalability. The best CRM software development company will offer post-launch maintenance and plan for growth.
Compare pricing models. Fixed-price, time-and-materials, and dedicated-team models each suit different projects.
Final Thoughts
California’s technology landscape offers plenty of choices, from platform giants to custom engineering specialists. For tailored, industry-aware builds, working with a dedicated CRM software development company is often the most cost-effective route to a system your team will actually use. Whether you need a healthcare CRM software development solution or real estate CRM software development services, shortlist two or three vendors, review their case studies, and start with a discovery call.
FAQs: CRM Software Development in California
1. What does a CRM software development company do?
A CRM software development company designs, builds, integrates, and maintains custom CRM systems. This usually covers sales automation, lead management, customer support, marketing automation, reporting, and connections to tools like ERP, email, and billing software.
2. Why choose custom CRM development over an off-the-shelf CRM?
Custom CRMs match your exact workflows, scale with your business, and give you full control over your data and security. Off-the-shelf tools are quicker to start with, but often need workarounds once your processes become more complex.
3. How much does custom CRM development cost in California?
Cost depends on features, integrations, number of users, compliance needs, and the pricing model. Simple CRMs cost far less than enterprise platforms with advanced analytics and automation. Ask for a discovery call and a detailed estimate, since fixed-price, time-and-materials, and dedicated-team models can produce very different totals.
4. How long does it take to build a custom CRM?
A basic CRM can take a few months, while a feature-rich or heavily integrated platform can take longer. Scope, third-party integrations, data migration, and testing all affect the timeline.
5. Why do healthcare providers need a specialized CRM?
Healthcare organizations handle sensitive patient data and must follow regulations such as HIPAA. A purpose-built healthcare CRM software development solution can manage patient engagement, appointment reminders, consent, and follow-ups while keeping records secure and auditable.
6. What features should a real estate CRM include?
Look for lead capture and scoring, listing management, buyer and seller pipelines, automated follow-ups, document handling, and reporting. Professional real estate CRM software development services can also add integrations with MLS feeds, listing portals, and communication tools.
7. How do I choose the right CRM development company in California?
Check the company’s CRM experience, industry expertise, security and compliance practices, integration skills, client reviews and case studies, and post-launch support. Shortlist two or three vendors and compare their proposals.
8. Can a custom CRM integrate with my existing software?
Yes. A good development partner builds APIs and connectors so your CRM works with accounting, marketing, telephony, ERP, and analytics tools, which prevents data silos.
9. Is a custom CRM secure and compliant with privacy laws?
It can be, when built correctly. Ask about encryption, role-based access, audit trails, and compliance with laws such as CCPA, plus HIPAA for healthcare. Your vendor should explain how these are handled.
10. Do CRM development companies offer support after launch?
Most reputable firms provide maintenance, updates, bug fixes, and scaling support. Confirm the support terms, response times, and costs in your contract before signing.

An Instagram growth service is not simply a purchase of more followers. It is a supplier decision that may involve account permissions, customer data, payment details and public-facing advertising. That makes the first question less “How quickly can it grow my account?” and more “What exactly will it do, and what access does it need to do it?”
A credible provider should be able to answer that plainly, in writing, before payment. If it cannot, the promised result is beside the point.
First, identify what is actually being sold
The service label matters less than the provider’s method, access requirements and ability to document the work.
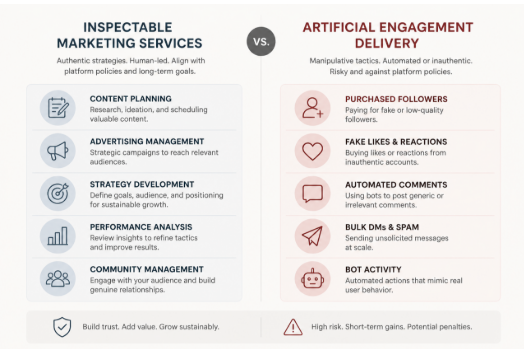
“Growth” is used for several very different services:
- Social media management: planning content, publishing approved posts, handling comments and reporting on results.
- Strategy and analytics: audience research, profile improvements, content testing and measurement.
- Paid advertising: buying exposure through Meta’s advertising tools, with defined targeting, budget and campaign objectives.
- Creator or partnership outreach: identifying relevant collaborators and managing legitimate campaign activity.
- Artificial follower or engagement delivery: supplying followers, likes, comments, views or automated actions intended to make an account appear more popular.
The first four can be legitimate marketing services, though quality varies. The last category deserves much closer scrutiny. Meta has publicly acted against services that used bots or automation to inflate likes, followers, views and comments; its account of action against fake engagement and ad scams is a useful reminder that artificial activity conflicts with its policies.
That does not mean every provider using the word “growth” operates in the same way. It means terms such as “organic”, “targeted”, “real users” and “human-led” are claims to investigate, not proof of a method. Ask what actions are performed, by whom, on which accounts, and how the provider avoids artificial engagement.
For a separate explanation of the trade-offs around artificial audience delivery, see Brecktic’s guide to whether buying Instagram followers is safe. The practical issue is not merely whether a number rises; it is whether the activity is authentic, relevant and safe for the account.
The non-negotiable rule: do not hand over credentials
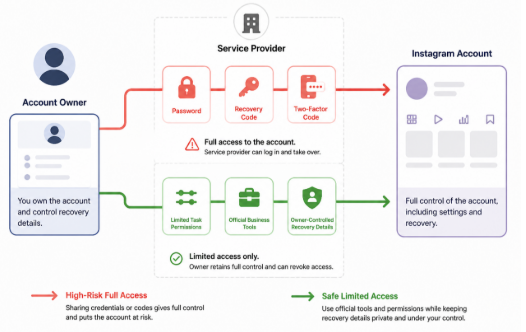
Safer onboarding limits permissions to the defined task and keeps authentication and recovery controls with the account owner.
Do not provide an Instagram password, recovery code, login code or two-factor authentication code to a growth provider. These are authentication secrets, not routine onboarding information. A request for them is a major security warning, even if the website appears polished or the provider says access is needed to “set up” the service.
Meta specifically advises people not to give Facebook or Instagram passwords to third-party sites or apps offering followers, likes or similar services outside official login mechanisms. A password can enable a third party to change recovery details, approve new sessions or lock the account owner out. A one-time code can be equally consequential if it is used to approve a login.
A safer workflow minimises access:
- Give a contractor only the role or task access needed for a defined job, where Meta’s current tools support it.
- Use official business or advertising tools for paid campaigns rather than sharing a personal login.
- Treat connected apps as permissions, not harmless add-ons. Check what an app can read, publish or manage before authorising it.
- Keep the account owner’s email address, phone number and recovery options under the owner’s control.
- Enable two-step verification. The UK National Cyber Security Centre recommends it for important accounts because it adds a further check if a password is stolen.
Permission names and menus change, so confirm the live settings in Meta’s help documentation before assigning access. The governing principle does not change: give the least privilege necessary, for the shortest practical period.
Red flags: stop signs versus questions to investigate
A useful vetting process separates reasons to walk away from issues that need clarification.
Stop signs
Leave the checkout process if a provider:
- asks for a password, recovery information or authentication code;
- promises a guaranteed volume of followers, likes or comments on a fixed timetable without explaining the source;
- offers immediate delivery of large quantities of engagement;
- cannot say whether bots, automated actions, engagement pods or follow-unfollow tactics are involved;
- uses urgency to push payment before terms can be reviewed;
- has no identifiable business, working support route, privacy information or commercial terms; or
- directs payment to an unrelated individual or asks for an unusually hard-to-reverse payment method.
None of these signals alone proves criminal intent. Together, they point to an unacceptable combination of security, supplier and reputational risk.
Caution signs
Pause and ask more questions when a provider:
- calls its service “organic” but provides no operational explanation;
- shows only follower-count screenshots rather than methodology or meaningful outcomes;
- makes broad claims about algorithm access, insider knowledge or guaranteed reach;
- will not define cancellation, refunds, renewal or notice periods;
- cannot explain how it handles client contact details and account data; or
- presents testimonials but no verifiable business identity or independent reputation trail.
The important distinction is between a provider that can document its process and one that substitutes slogans for evidence.
Run a five-minute website and checkout audit
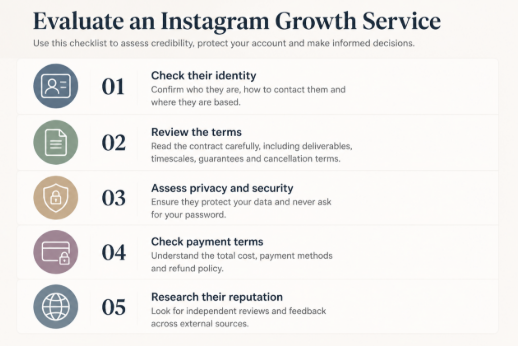
A quick supplier audit can expose unclear identity, access demands and weak commercial terms before payment.
Before paying, perform a basic supplier check. This is not a formal certification process; it is a quick way to decide whether the provider merits further discussion.
1. Check identity. Look for a legal business name, a physical or registered contact route, a company number where applicable, and a domain-based support address. For UK customers, compare company details with the public Companies House register where a company number is supplied. A brand name alone is not enough to establish who will hold your payment or data.
2. Read the commercial terms. Find the total price, billing frequency, cancellation process, refund conditions, delivery description and complaint route. Vague wording such as “results may vary” does not replace a clear explanation of what is being purchased.
3. Inspect data handling. A privacy notice should say what information is collected, why it is used and how to contact the organisation. Be especially wary if a supplier requests more account data than its stated service requires.
4. Check the payment path. Confirm that the checkout domain, merchant description and business identity are consistent. Prefer a payment route that offers a record of the transaction and a defined dispute process. Do not confuse a padlock icon with proof that a business is trustworthy; it only indicates a protected connection.
5. Search beyond the provider’s own site. Look for a durable trail: business listings, editorial mentions, support responsiveness and reviews that discuss specific work rather than repeating generic praise. Treat reviews as one input, not conclusive proof.
Test the delivery model, not the marketing language
Ask prospective providers these questions in writing:
- What actions will you take on my behalf?
- Will any action be automated? If so, which action and with what safeguards?
- Where does the prospective audience come from, and how is relevance to my UK market assessed?
- Are followers, likes or comments purchased, incentivised, exchanged or otherwise artificially delivered?
- What account access is required, and why is each permission necessary?
- What is the smallest paid test, and how can I end it?
A strong answer describes a process: content work, campaign setup, audience research, outreach, ad spend management or reporting. A weak answer circles back to a result: “real growth”, “premium followers” or “safe engagement”.
Be particularly careful with “guaranteed” results. Marketing can set service levels, such as a reporting schedule or number of approved posts. It cannot credibly guarantee that a particular number of people will become genuinely interested in a business on demand.
Measure outcomes that matter
Follower totals are easy to display but weak evidence of commercial value on their own. They do not show whether new people are relevant to the business, remain engaged, visit a website, enquire, buy or remember the brand.
Ask for reporting that distinguishes activity from outcome. Depending on the objective, useful reporting may include:
- the audience and geography the work was intended to reach;
- content themes and creative tests undertaken;
- reach and meaningful interactions over a stated period;
- profile visits, link actions, enquiries or sales where tracking is available;
- paid-media spend separated from agency fees;
- source data from the platform, not just a designed summary; and
- lessons, limitations and the next test.
No single metric proves success. A good report explains what happened, how it was measured and what decision follows. It should also make it possible to spot a mismatch between a rising follower count and an audience that has little reason to care about the account.
UK advertising: keep commercial content identifiable
Growth work can overlap with influencer marketing, gifted activity and paid collaborations. Where content is advertising, UK guidance expects it to be obviously identifiable. The ASA and CAP’s guidance on recognising ads in social media and influencer marketing explains that labels such as “Ad” should be clear and prominent, generally before people need to engage with the content.
Responsibility can extend to brands, agencies and influencers. The exact position depends on the relationship and content, so this is general information rather than legal advice. Build disclosure review into campaign approval instead of treating it as a last-minute caption edit.
A simple scorecard for any provider
Use this editorial scorecard before proceeding:
| Area | Pass | Caution | Stop |
| — | — | — | — |
| Identity | Verifiable business and responsive contact route | Limited history or incomplete details | No accountable identity |
| Access | Least-privilege permissions, no credentials | Access explanation is unclear | Requests password or codes |
| Method | Specific, documented process | Vague claims need answers | Artificial delivery or undisclosed automation |
| Terms | Clear price, scope and exit route | Ambiguous clauses | Hidden renewal or no cancellation route |
| Reporting | Objectives, source data and learning | Follower-led reporting | Only promises and screenshots |
| Testability | Small, reversible trial | Large minimum commitment | Pressure for a major upfront payment |
One stop result should end the conversation. Caution results are not an automatic rejection, but they should be resolved in writing before money or permissions change hands.
If you have already shared access
Act promptly. Change the Instagram password from a trusted device, turn on two-step verification, and review account contact and recovery details. Check active sessions and connected apps, remove anything unfamiliar, and review any business or advertising access that you do not recognise. Monitor recent posts, messages, profile edits and payment activity.
If you can no longer access the account, use Instagram’s official recovery route. Retaining control of the linked email address and phone number can be important to recovery, so secure those accounts too. If payment details were shared, contact the payment provider promptly and preserve relevant records, including receipts, emails and screenshots.
Choose growth mechanisms you can inspect
The lowest-risk options are generally the ones a client can see and evaluate: stronger content planning, a clear profile proposition, legitimate collaborations, responsive community management and advertising run through official tools with defined objectives and budgets.
A provider does not need to promise artificial popularity to be useful. It should explain its method, restrict access, document the commercial relationship and report on outcomes relevant to the business. For further reading on account-safety considerations, Brecktic provides additional context.
The core test is simple: if a service cannot explain how it works without asking you to trust a vague promise or surrender control of the account, it is not ready to be hired.
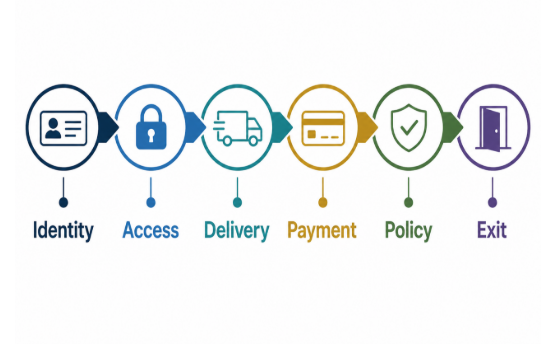
A practical six-control framework for assessing an Instagram growth service before granting access or paying.
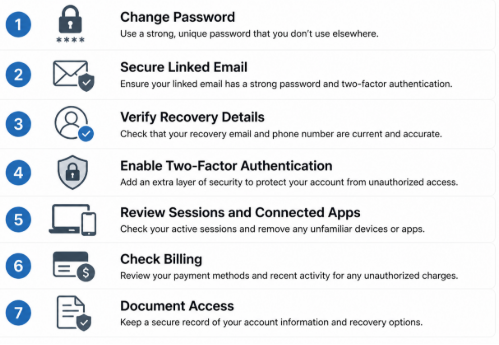
Immediate account-security checks after sharing access with an external provider.
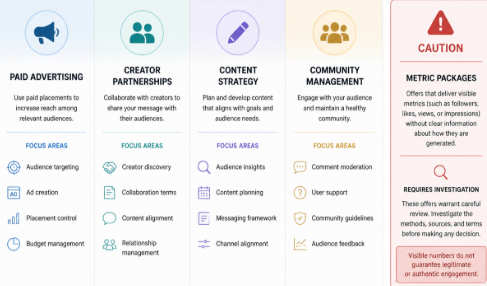
Different service models require different checks; a headline metric does not explain how activity is generated.


Business communication has changed dramatically over the past decade. Teams no longer depend entirely on desk phones, physical offices, or traditional telephone networks to stay connected. Employees work from different cities, customer support teams operate across time zones, and businesses increasingly expect communication tools to work alongside the digital applications they already use. In this environment, VoIP technology has become an important part of how modern organizations handle voice communication.
Voice over Internet Protocol, commonly known as VoIP, allows voice calls to travel over internet networks rather than traditional telephone infrastructure. That simple change opens the door to a much more flexible communication environment. Businesses can connect employees, customers, sales teams, support agents, and distributed teams through software-based phone systems accessible from computers, smartphones, IP phones, and other connected devices.
But VoIP is not simply about making cheaper phone calls. Modern VoIP solutions can include call routing, interactive voice response, call recording, analytics, conferencing, voicemail, CRM integration, mobile access, and automation. In other words, the business phone system is becoming less like a standalone appliance and more like a connected software platform.
What Is VoIP Technology and How Does It Work?
VoIP technology converts voice conversations into digital data and transmits that information through an internet connection. Instead of depending on a dedicated traditional telephone line for every conversation, VoIP systems use IP networks to establish and manage calls.
A typical business VoIP environment may include cloud infrastructure, SIP services, IP phones, computers, mobile applications, call management software, and business integrations. When these components are designed properly, employees can communicate through a unified system, whether they are working from an office, home, or another location.
- How VoIP Works
When a person speaks during a VoIP call, the system converts the audio into digital data packets. These packets travel through an IP network and are reconstructed as audio at the receiving end, allowing the conversation to happen in real time.
The process sounds technical, but the user experience can be remarkably simple. An employee can open a VoIP application, select a contact, and make a call much like they would with a conventional phone.
- VoIP vs Traditional Phone Systems
Traditional phone systems often depend on physical infrastructure, fixed lines, and hardware installed at specific locations. VoIP shifts much of that communication infrastructure into software and internet-based services.
This makes VoIP particularly useful for organizations that need flexibility. Instead of treating every new employee or office location as a major telephone infrastructure project, businesses can configure users and extensions through a software-based communication system.
You may also like: Top 10 VoIP Billing Solutions for Modern Businesses
Why VoIP Is Becoming Important for Modern Businesses
Modern companies need communication systems that can keep up with changing work patterns. Employees may move between offices, work remotely, travel frequently, or communicate with customers from mobile devices. A communication platform that is tied too closely to a physical location can become difficult to manage as the organization grows.
VoIP addresses this challenge by separating business communication from a specific physical phone line. Users can often access business calling features through compatible devices and applications, giving organizations greater flexibility in how they structure their communication workflows.
- Flexible and Remote Communication
One of the most useful aspects of VoIP is its support for distributed teams. Employees can use business communication tools from different locations while remaining connected to the organization’s phone system.
A sales representative working from home, a support agent in another city, and an employee working from the company office can all operate within the same communication environment. This flexibility is especially useful for businesses with hybrid and remote work models.
- Cost-Effective Business Calling
VoIP can also help businesses manage communication expenses by using internet connectivity instead of relying entirely on traditional telephone infrastructure. The overall cost depends on factors such as provider plans, call volume, features, infrastructure, and implementation requirements.
For businesses with multiple locations or significant calling requirements, consolidating communication through a VoIP platform can simplify management while potentially reducing certain telecommunication expenses.
Key Features of Modern VoIP Solutions
Modern business phone systems can do much more than connect two people on a voice call. VoIP platforms can combine calling, messaging, conferencing, call management, analytics, and integrations into a single communication environment.
This makes VoIP particularly valuable when communication needs to connect with broader business workflows. For example, a customer call can be associated with a CRM record, while a support interaction can be recorded and analyzed for quality management.
- Call Routing and IVR
Call routing and Interactive Voice Response (IVR) help businesses direct incoming calls to the right department or employee. Customers can select options from an automated menu, while routing rules can determine where calls should go based on business hours, availability, department, or other conditions.
A well-designed IVR system can reduce unnecessary transfers and help customers reach the appropriate team more efficiently. It can also provide basic information automatically without requiring an employee to handle every request.
- Call Recording and Analytics
Call recording can help businesses review conversations, train employees, maintain quality standards, and understand customer interactions. Depending on the system and applicable requirements, businesses can configure recording policies around specific users, departments, or call types.
VoIP analytics can provide additional visibility into communication activity. Metrics such as call volume, duration, missed calls, wait times, and agent activity can help managers understand how communication processes are performing.
- Video Calling and Team Collaboration
Many modern VoIP platforms extend beyond voice communication to include video meetings, conferencing, screen sharing, messaging, and collaboration features. This allows organizations to bring multiple communication methods into a connected environment.
Instead of switching between several unrelated applications, teams may be able to manage different forms of communication through a unified platform. That can simplify daily workflows, particularly for distributed teams.
Benefits of VoIP for Business Communication
The biggest advantage of VoIP is the flexibility it brings to business communication. Organizations can configure users, extensions, call flows, applications, and integrations according to their operational needs.
VoIP can also make it easier to connect with other digital systems. This is important because business conversations rarely happen in isolation. A customer call may involve a CRM record, a support ticket, an order, a sales opportunity, or a previous interaction.
- Easy Scalability
Traditional phone infrastructure can become complicated when a business adds employees, departments, or locations. VoIP systems can often make expansion more straightforward because users and extensions can be managed through software.
A growing company can add new employees, configure extensions, modify call routing, and introduce new communication features without necessarily redesigning its entire telephone infrastructure.
- Business Application Integration
VoIP can integrate with CRM, help desk, ERP, collaboration, and other business applications. With the right integration, employees can make calls directly from business software, access customer information during conversations, or automatically associate call activity with customer records.
This creates a more connected workflow. Instead of communication data remaining inside the phone system, it can become part of the broader digital customer and business experience.
How Businesses Are Using VoIP Technology
Businesses use VoIP across many functions because voice communication remains important as digital channels continue to expand. Sales teams use calls to communicate with prospects, support teams handle customer issues, and internal teams use voice and video for collaboration.
The technology is especially useful when organizations need communication across multiple locations while maintaining centralized control over users, call flows, and business numbers.
Customer Support and Call Centers
Customer service operations can use VoIP features such as IVR, call queues, call recording, agent routing, monitoring, and analytics. These capabilities help organizations structure large volumes of incoming and outgoing communication.
Call center managers can also use reporting features to understand call patterns and identify areas where customer communication processes may need adjustment.
Remote Teams and Distributed Workforces
VoIP makes it easier for remote employees to remain connected to the same business communication environment as office-based employees. Users can access calling features through supported desktop applications, mobile applications, or IP devices.
This can help businesses maintain consistent communication practices even when employees are distributed across different locations.
VoIP Security and Reliability Considerations
Because VoIP communication travels through digital networks, security must be an essential part of system design. Businesses should consider authentication, encryption, access controls, network security, fraud prevention, software updates, and monitoring when deploying a VoIP environment.
Reliability is equally important. Voice communication depends on network performance, bandwidth, latency, and system availability. Businesses should therefore evaluate their network infrastructure and consider appropriate redundancy, monitoring, backup connectivity, and disaster recovery strategies.
A reliable VoIP solution is not simply one that works when everything is normal. It should also have a plan for handling network disruptions, hardware failures, service interruptions, and unexpected traffic.
Challenges of Implementing VoIP
VoIP offers significant flexibility, but implementation still requires careful planning. Poor network quality can affect call performance, while incorrectly configured systems may create security or routing problems. Businesses also need to consider how the new communication platform will interact with existing applications and workflows.
Another challenge is user adoption. Employees need to understand how to use new calling features, applications, voicemail systems, conferencing tools, and collaboration capabilities. Proper configuration, testing, training, and ongoing support can make the transition much smoother.
For organizations with complex requirements, custom development may also be necessary. A business might need specialized call routing, custom dashboards, CRM integration, mobile applications, APIs, or unique automation workflows that are not available in an off-the-shelf platform.
How Moon Technolabs Can Help With VoIP Development
Moon Technolabs can help businesses develop custom VoIP solutions around their communication requirements. This can include VoIP application development, SIP integration, call management, IVR, call routing, conferencing, CRM integration, mobile communication, analytics, and other business communication capabilities.
The development approach can be tailored to the organization’s existing infrastructure and future growth plans. From designing the communication architecture to developing, integrating, testing, and maintaining the solution, a custom approach can help businesses create a VoIP environment that fits their workflows rather than forcing those workflows into a rigid communication platform.
Conclusion
VoIP technology is changing business communication by making voice services more flexible, software-driven, and connected. Businesses can move beyond traditional phone systems and introduce features such as intelligent call routing, IVR, analytics, recording, conferencing, mobile access, and business application integrations.
The real value of VoIP comes from how these features work together. A business can connect its phone system to customer data, support workflows, remote teams, and operational tools, making communication a more integrated part of the digital business environment.
As organizations continue adopting flexible and distributed working models, communication technology needs to support people wherever they work. VoIP provides a foundation for that while giving businesses greater control over how they manage, monitor, integrate, and scale calls.

Drain Unblocking London: How to Clear Problems Properly and Prevent Repeat Blockages

Top 13 CRM Software Development Companies in California

Staying in Chora With Little Venice at Your Door

AI-Generated Nano Banana 2.1 Visuals: What Shopify Beauty Ecommerce Brands Should Check Before Publishing

YesWelder FIRSTESS MP200 Pro: One Machine for Welding, Cutting, and More


The 15 Highest-Paid Rugby Players in the World

Christopher Dare: The Untold Story of Engineer and Former Husband of Angela Rippon

How to Ensure Your Home is Valued Correctly for a Quick Sale

What Is Fanquer? The Digital Creator Platform Transforming Direct-to-Fan Engagement

Dr Jared Ross: Missouri Appeals Court Upholds Protection Order Over Graphic Torture and Murder Threats

Nancy Hallam: The Inspiring Life, Career, and Success Story Behind Ian Wright’s Wife
The 15 Highest-Paid Rugby Players in the World
Christopher Dare: The Untold Story of Engineer and Former Husband of Angela Rippon
How to Ensure Your Home is Valued Correctly for a Quick Sale
What Is Fanquer? The Digital Creator Platform Transforming Direct-to-Fan Engagement
Dr Jared Ross: Missouri Appeals Court Upholds Protection Order Over Graphic Torture and Murder Threats
Nancy Hallam: The Inspiring Life, Career, and Success Story Behind Ian Wright’s Wife
-
 Sports5 months ago
The 15 Highest-Paid Rugby Players in the World
-
Celebrity11 months ago
Christopher Dare: The Untold Story of Engineer and Former Husband of Angela Rippon
-
 Real Estate8 months ago
How to Ensure Your Home is Valued Correctly for a Quick Sale
-
 Technology5 months ago
What Is Fanquer? The Digital Creator Platform Transforming Direct-to-Fan Engagement
-
 Celebrity4 months ago
Dr Jared Ross: Missouri Appeals Court Upholds Protection Order Over Graphic Torture and Murder Threats
-
Celebrity11 months ago
Nancy Hallam: The Inspiring Life, Career, and Success Story Behind Ian Wright’s Wife
-

 Celebrity7 months ago
Who Is Azriel Crews? Inside the Life and Career of Terry Crews’ Daughter
-

 Health9 months ago
Enclomimed 25 (Enclomiphene) – Effective PCT Protocol